
- The stamens. Make 6. Cut six 3" pieces of #32 white covered wire. Bend the wire over about 3/4" as shown in the photo below. Moisten this part with egg white or gum glue and dip in something like corn meal to resemble pollen. (I used a mixture of gelatin powder and yellow petal dust.) Let dry.
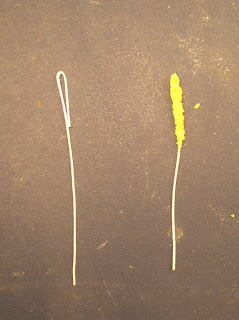
- The pistil. Cut a length of #18 covered wire. This will be the actual stem of the tulip. Colour some gum paste a very light green. Moisten the end of the wire and work the paste to cover the top 2 1/2" of the wire. Pinch the top of the paste into three, as in the photo. Leave upright to dry.
 This photo is of my oval cutter and the pistil.
- Petals. Make 6, three should be slightly narrower. Colour some gumpaste the shade you want your tulips. Roll out thinly on a grooved board
 Turn paste over and cut out petal. Moisten the end of a 4" length of #28 covered wire and push into the raised portion of the petal.
  Tool the petal to thin out the top edge.
 Vein each petal. I have an Aldeval tulip veiner which works well.
- Make at least one extra large and small petal in case of breakage. So for one tulip make 4 large and 4 small petals. Gently push petals into a dessert spoon and leave to dry at least overnight.
 Next I dusted the petals with a slightly darker red, just enough to bring out the veins. I also brushed a little black at the base. It's easier to dust before the tulip is assembled.
  Use green florist tape to tape the six stamens to the pistil;
 - Tape the 3 smaller petals evenly around, to the base of the pistil. Tape each one separately so that they will stay in place and not slide around.
- Tape the 3 larger petals in between the smaller ones evenly around to the base of the pistil;
- You may want to add another one or two lengths of #18 wire to the stem to make it more like a tulip stem which is fairly thick. This is the finished tulip, dusted and steamed.


Leaves
 I rolled out a large piece of green paste and cut out the leaves freehand. You should leave a thicker piece from the base of the leaf about one third of the way up the middle to hold a wire. I also veined the leaves with my yellow rolling cutter, and the edge of a knife. Just don't press hard enough to thin the paste. Dry on crinkled tinfoil to give the leaves some movement. Dust and steam. About a quarter of the folks who visit my blog do so by googling "gum paste tulips". I would love to know if you found the tutorial useful.
 FRILLY TULIP
Note added 25th Feb. 2010: I have a post on my blog showing how I made a frilly petalled tulip. Click here for the link.


