Showing posts with label tutorial. Show all posts

Tuesday, May 24, 2011

OOPS, Part 2: Before and after

Here is the first completed Outside Oslo Project Status (OOPS) report using Jessica Jones' newest fabric line. (A great place to purchase Outside Oslo is Marmalade Fabrics).

The "before" picture. I picked this up at a garage sale a couple of weekends ago, envisioning more fabric storage space for my sewing room. It came at a drastically reduced price because "the leg was broken." Turns out the legs screw in, and it just needed to be tightened! I thought the seller would ask about $15 and I was prepared to offer $10. However...she started the bidding at $2. Yes, you read that correctly. $2!! I felt a counter-offer on my part was not really in order...
In case you are wondering, before I get started on my little tutorial, here is a bit of information. There is an interior height of 9 inches (not including lid and also not including the legs--when you add those it stands about 18 inches from floor to top of lid), width of 19 inches and depth of 16 1/2 inches.

The second thing you need to know is that I had a wild idea that I could "do it all by myself"--that thought probably stemming from the fact that I spend a lot of time with 3- and 4 1/2-year-old grandchildren and hear that phrase repeatedly. While it probably IS possible, I highly recommend having someone willing to help you. Mark generously agreed to be that someone.

Part 1: Deconstruction.

The idea is to take it apart, and then put it back together in the opposite order. The legs came off first. Mark made this cool little painting rack by drilling some holes in a scrap piece of lumber.


We had some charcoal spray paint with a metallic finish--nothing too glitzy and just the perfect color for the fabric we were using. I did purchase some Kilz primer in a spray can. Hated it. We thought we shook it up long enough but still it came out gloppy. If I were doing it again, I would just roughly sand the legs (as we did), skip the priming stage because it's not like the legs are getting a lot of wear or anything, and then just spray several coats of the finish paint.  Because of the gloppiness, a couple of the legs didn't have a smooth finish, so we put them in the back of the stool.


Next we took off the hinges from the back and then all the little strips of wood that covered the raw edges of the fabric on the inside lid and bottom.

I can't tell you how gross this fabric was. It practically disintegrated when touched and made me feel the necessity of having hand sanitizer nearby. We removed all the staples and then used the fabric as a template.
This is what the lid and bottom looked like after we got all the fabric removed. The lid was padded with a little bit of foam; we used the original foam rather than replacing it.

Part 2: Putting it back together:

At this point, I laid my new fabric wrong side up, got out my sharpie pen and traced around the fabric we removed from the lid, cutting the same notches out of the four corners.

Next came the sewing. This is the ONLY sewing, and it involved matching the notched-out edges right sides together and sewing a 1/2-inch seam.

Each corner looked like this when it was turned right-side out again.

I did that to each corner and it fit like a glove over the top of the lid. This works great because otherwise you would have to do kind of a miter fold on the outside and staple or tack it down somehow. This eliminates all that fabric bulk. Then it just involved folding the raw edges to the inside of the lid, stapling it down, stapling the little wooden strips back on to cover the raw edges and, voila! Fabulous new lid.

Speaking of staple guns, I should mention  that I had made the suggestion to Mark that perhaps a staple gun that attached to his air compressor might be a good idea. But you know how men DETEST the thought of going to the hardware store to purchase a new tool. So after getting out of the way so he didn't knock me over on his way to get into the truck to drive to Lowe's talking him into the merits of a new staple gun that would also be useful for other projects, we were back from Lowe's in a jiff and continued on with our project.

Moving on: The bottom fabric was one long strip. I measured the length and width of the old fabric, cut two pieces of the new fabric (matching the pattern), sewed one seam. Oops. I just said there was no more sewing involved. Okay. I had to sew these two pieces together to get the length I needed to go all the way around the outside. We kind of centered the fabric from top to bottom around the outside circumference of the bottom, so there was about an equal amount of fabric to fold around to the inside at the top of the box for stapling, and the same to fold under and staple on the bottom.

Hmmm. I'm beginning to like all these power tools!

Added the hinges on the back and screwed the legs back in (even that pesky "broken" leg).

Ready to see the finished project?

In its new home: my sewing room:
Want to see the best part? I KNEW this was the project for me when I opened it up and found this little plastic tray, which meant that it was a....

SEWING CHEST!!! I would have gladly paid $10 for this little beauty. I almost feel guilty that I got it for $2.

Almost...

Sunday, May 8, 2011

I've Fallen Weeks Behind

I've been so lazy with my blogging these last few weeks. I had a marvelous school holiday and even escaped to the beach for a couple of days. It was crispy autumn weather. We went to Point Nepean. On the left is the peaceful bay and on the right is the open ocean. We walked through the park and caught the shuttle. It used to be an old army base. There were some very cool rusty relics.
We sat on the beach and walked and drank coffee and ate yummy food.
The boys are studying for their mid years. Hard Life!
I took my hexies with me. They are so portable.

There is no plan with these guys. I am just adding on scraps as I go. No paper piecing. I'm just drawing the lines and sewing them together with running stitch. My textile teacher way back at uni would be horrified but it works! 
I loathe to throw away even the tiniest bits of fabric which is why I am getting so much pleasure out of this project. I also have been using my scraps to make these.

I got the idea from One Shabby Chick. I have linked her straight to her tutorial on how to make these little purses. They are so easy to make and use up lots of scraps.
I think they will make great end of year presents for some of the teachers I work with.
During the holidays I had to baby sit Phil, my class pet. When I first introduced him he looked like this.
During the December holidays he lost his exoskeleton and now looks like this.
He is no longer brown and 'twig like' but green with yellow horny legs and hard to find amongst the eucalyptus leaves. He is also nearing the end of his days. I found out that he is a Goliath Stick Insect which makes sense because he is probably 10" long.
I finished Rivka's quilt for her brother. It really is fun. It's binding was from Denyse Schmidt's new range. Although I can't say I love the range, the colour was perfect for the binding.
I think there is still more to tell but that is for another day.

Thursday, April 7, 2011

Custom Selvage Camera Strap Tutorial (kind of...)

I'm definitely not going to give you a tutorial on how to make a customized camera strap. If you don't find the strap that came with your camera very, um, attractive, there are some really good tutorials on how to change that.

You can kind of give it the slipcover effect here and here.

Want to get rid of the whole webbing strap, make a new padded one and attach it to the fake leather end pieces? Here you go. I'm sure this would be awesome, but it looks like a lot more trouble than I want to go through.

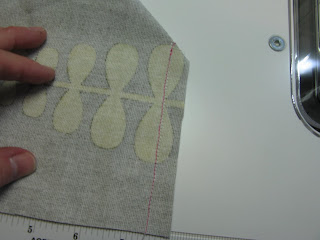
Rather, this is a tutorial on using selvages to customize the fabric you use to make the strap cover.
For making the actual strap cover itself, I used a tutorial by Amy Priddy which I found very straightforward, with good instructions and lots of pictures.

First of all, let it be said that I am not blaming Amy at all for the problems that followed. Nope. Not one single bit. For that I'm blaming the fact that I had a cold and should have been relaxing on the couch instead of trying to do anything that involved math. When you are on cold medication, you should also NOT be considering projects that involve sharp objects (a rotary cutter), heat (iron) or moving parts (a sewing machine). Really not a good combination.

Nevertheless, my first thought was "how hard could it be??" It was a simple matter of changing out the printed fabric with some custom-made selvage fabric, and then just continue on with Amy's instructions.

The first step was to measure my existing strap. And that's exactly when my problems began. Amy said this tutorial was for a strap that was 22 inches long and 2.25 inches wide. Her instructions were to cut the fabric 23 inches long and 5.5 inches wide.

Okay. My strap was the same in length but only 1.5 inches wide. So 1 inch longer and double the width of the strap. 23 inches in length was fine, and the width should be 3 inches, right? Right? I looked at her measurements again. You know. Measure twice. Cut once. Yep 2.25 times 2 equals 5.5 inches.

I cut the base fabric for my selvages, 23 long by  3.25 inches wide, and patted myself on the back for cutting it wider than it needed to be. Better safe than sorry.

Is anyone seeing the problem already? Well, it had not dawned on me yet that my width was WAY too narrow, so I bravely carried on.

I had a nice pile of Anna Maria Horner "Innocent Crush" selvages all ready to go.

I found it really helpful to use the 45 degree angle line on my ruler to draw pencil lines on my base fabric. (You can safely use any fabric for the base--whether it is coffee stained or from a previous project that didn't quite turn out the way you thought it would).I originally drew the lines about 2 inches apart, but after sewing the first couple of selvages, I realized that drawing a line about every half inch would make it easier to keep the angle of the selvages more uniform when I sewed. And if you're not on cold medication, you might be able to get by with "eyeballing" it.

It helps to add a dab of glue too, especially at the beginning. Start on the right side, sew a selvage close to the finished edge, lay the next one on top, covering the raw edge of the first selvage, sew, continue in this manner until the whole base fabric is covered with selvages.


Turn your finished piece over and trim the excess selvages (a picture of this step would have been a nice touch but I forgot to take it...). My base fabric was now 23 inches long by 3 1/4 inches wide.

I think it was at about this point that I realized it was going to be way too narrow! I started calculating the seam allowances. I looked at Amy's measurements again, and then I saw it. She doubled the width of the strap, and ADDED ONE INCH! Geez.

Time for a "design decision."

I cut two strips of orange fabric and added one to each side. Then I continued on with Amy's directions.


When all was said and done, it was still a tight fit, and involved a needle-nose pliers to pull the existing strap through the new slipcover.

I'm going to try it again. I'll make it (at least) 1 1/2 inches wider. So much easier to trim the width than to ADD to the width.

In retrospect, the orange fabric is kind of a nice little "bonus" and I'm pretty happy with the strap.

My advice is that if you decide to slipcover your existing strap, you probably don't need the addition of the fusible batting.

Oh, and choose a time when you aren't under the influence of cold medication...

Thursday, January 13, 2011

A slight change of plans...and a fabric marking tutorial

I was so excited when Corey of Little Miss Shabby decided to do a block of the month involving embroidery. I have embroidered a long time ago and it was time to dust off my skills.

Corey was using the Sunkissed line by Sweetwater, and I have to say that I had been anxiously awaiting this line for months. So it seemed obvious to me that I would do the block of the month using the same line.

But then the mail arrived: Central Park by Kate Spain and Hoopla by Moda. And the plans changed.

For some reason, the Hoopla line had some fabrics that read as "folk art" to me, and reminded me of the crewel embroidery I did in the '70s. I also knew it needed something more substantial than a light background for the embroidery.
I had some Robert Kaufman "quilter's linen"  in chocolate and liked the look of it against all the bright colors of Hoopla, and it matched the stems perfectly.

I knew using a blue water soluble marker wasn't going to work on the dark brown so I went to my local quilt shop, and the owner and I did a little experimenting. This is what we finally decided on and it worked like a charm.

My store receipt says this is "interfacing, tracing cloth red dot." I think you can use it for patterns that have multiple sizes and you don't want to cut off the larger size lines because you are making the smaller size. So you can trace the pattern size you want onto this interfacing, using the red dots as registration markers.

Got that? Anyway, it's pretty cheap. A yard was $1.50 and obviously I have lots left over for the rest of the blocks.

I traced the pattern onto the interfacing with a Sharpie. Next time I will use a finer-point Sharpie as this bled, but in the long run that doesn't even matter.


The next dilemma was what to use for marking. Sew Line is a chalk marker and it comes with interchangeable lead. I got both the white chalk and the grey graphite. I think it comes in multiple colors as well. It is awesome. I just laid the interfacing on the fabric and traced again with the chalk marker. It went through the interfacing and onto the brown fabric and made an easy-to-see embroidery line to follow.

Corey is using all six strands of embroidery floss in her directions. I have never used all six strands before, but for Hoopla I really like the chunky look. When I try the Kate Spain Central Park version, I will probably try it with three strands and see how it looks.


By the time I got the majority of the embroidery done, some of the chalk lines were a little faint. But I just looked at the pattern, got my chalk marker and made them again, free hand. Easy peasy.

Next up will be the Central Park version. But for now, I'm loving the look of the bright colors on the dark background. Chirp, chirp.

Saturday, December 18, 2010

My First Tutorial

I have learned how to do many things from online tutorials. So I kept thinking, "Hey, I should write a tutorial." But about what? And then a link popped up on the bottom of my blog yesterday and it triggered something back in my brain, so I clicked on it, and guess what? I already have written a tutorial. Thank goodness for Blogger archives because my brain doesn't archive things that far back....

I made monthly postcards for each of my grandchildren for a year, until they turned 1.  So for the four of you who already read this back in 2008, please feel free to move on. For the rest of you, the encore presentation of my first tutorial: 'how to make a fabric postcard."

1. Have fabulous grandchildren. Lacking this, have other great family members or friends who would appreciate something custom-made by you...just for them. Choose carefully. Not everybody fits into this category, and you'd hate to have someone receive one of these little works of art in the mail, read the message, and then toss it in the recycle bin. Send those people an email instead.

2. Choose some fun fabric. With my granddaughter, Charlotte, I tried to pick something appropriate for the month in which it was sent. You know, snowflakes for January, hearts for February. With my grandson, Levi, I decided sports was the ticket. And for his December postcard, really, who could resist little fish wearing Santa Hats and reindeer antlers?


3. Choose some plain fabric for the back, or message, side. I used muslin, but any light solid fabric would work.

4. Get some stiff interfacing with fusible web on both sides, such as fast2fuse, the thinner version, which is about 1/8 inch thick and can be fused using a steam iron.


And yes, I DO realize that photographing white interfacing on a white background probably wasn't the best choice...

5. Cut each of the above 4 inches by 6 inches.

6. On the solid plain fabric, your message will be on the left side and address on the right side. I read somewhere that the post office likes the two sides to be separated with a line and also likes the word "postcard" at the top. You'd think they would be able to tell the difference between postcards, letters, and packages...but maybe not.

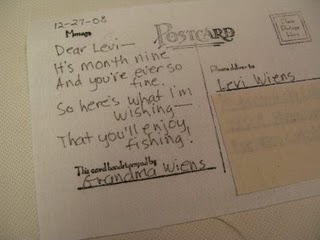
7. Compose and write your message using a fine-tip permanent marker, such as a Pigma pen. Heat set for a few seconds with an iron. Note: For Charlotte and Levi, I had decided to send them one postcard each month for their first year. Each month, I wrote four lines that could only loosely be considered a poem, and only because it DOES contain a couple of rhyming words. In the interest of self-disclosure but at the risk of personal embarrassment, here is Levi's current card, ready to hit the mail today. And yes, I have already apologized to their parents for my lack of poetic skills.


8. Fuse to the interfacing. If you are careful, you can make a little postcard "sandwich" and fuse about thirty seconds on one side, then turn it over and fuse on the other side.

9. Set your machine for satin stitch, a really close zigzag stitch. I like to go completely around the postcard twice because it nicely covers up the raw edges.


10. Add a stamp. I use a stamp for first-class mail, not a postcard stamp, because these weigh a little more and I want to make sure there is enough postage. And I also add a drop of Elmer's glue to make sure it's nice and secure.

11. Get yourself down to the post office and ask them to please hand cancel your little piece of art. They will be impressed with your postcard. But I can't help wondering if they are rolling their eyes if they read my poem as I'm walking out the door...


12. If you are making your postcard in December, get a holiday-themed postmark. There are lots of them and it's kind of hard to pick. Of course, there's always the North Pole, either Alaska or New York, and I knew there was a Bethlehem in Pennsylvania, but who knew there were five others? You can check out the list of possibilities here, along with the mailing instructions. Charlotte lived in Oregon for her first Christmas, so I sent her postcard to Christmas Valley, Oregon. Now that Charlotte and Levi live a mile from us, it was a bit harder to decide. Levi's Grandpa is from Minnesota. So won't it be cool to get a postcard from Frost, Minnesota?
And there you have it. My first tutorial. I realize it's too late to get the holiday-themed postmark for Christmas, but keep in mind that this would make a great gift for Valentine's Day as well. I'm thinking Loveland, Colorado....