Showing posts with label selvages. Show all posts

Tuesday, July 5, 2011

Let the Voting Begin

About a week ago, I was contacted by Karen of Venezie Designs, asking whether I wanted to enter a voting challenge of items made from selvages. Of course!! I sent her three entry pictures and she chose Spool Play.
Whew! I'm up against some stiff competition for sure! It's early in the voting but so far I think Jules from Chicken Julie is gaining an immediate lead with her Blogger's Quilt Festival entry. A whole quilt made with blocks like these--it's stunning! 
 (picture grabbed from Jules' blog--hopefully she won't mind, since it's almost like I'm telling you to vote for her instead of me...)

By the way, Jules will be featured in a future Name Game spotlight, actually a double spotlight because her Flickr/etsy name is Chicken Julie, but her blog name is From Three to Insanity. Don't worry. I won't hold it against her if she beats me by a landslide. She is super creative and I can hardly wait to hear how she chose each of those names.

But back to the topic at hand. I would of course LOVE to get even a few votes. But like I said. Stiff competition. Go see for yourself!

Friday, May 13, 2011

Bloggers Quilt Festival: Spool Play

Welcome to Spring Bloggers Quilt Festival! I'm so happy you stopped by.

Spool Play was made as a challenge quilt for a quilt retreat I attend every year.

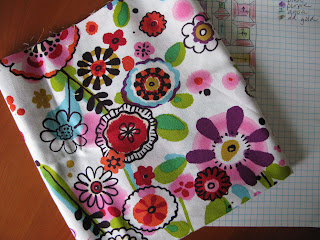
Everyone is given 1/2 yard of a specific fabric. Here is this year's fabric.
 
The idea for my quilt came from a combination of wanting to do a traditional spool block but in different sizes, and my absolute obsession with selvages edges, so I got out my graph paper and colored pencils.

While most of my selvages are stored in ziplock bags by category, this quilt required selvages to be sorted by color.
It was really fun seeing the quilt come together block by block.


When it came time for the quilting, I machine quilted in the ditch around brown part of each spool, and then outline quilted around each full spool using perle cotton.

In the border I used a fabulous variegated perle cotton, and even added a sewing needle in the bottom border.

Can you see the selvage edge pieced into the flowered border?

This was a fun and easy quilt to make. I hope you enjoyed seeing it. Enjoy the rest of the show!

Friday, April 29, 2011

Psssst....I'm on pins and needles!

I'm over here as a guest, talking a little bit about thread, needles and pins. I wasn't planning on doing another giveaway so soon after Sherbet Pips, but this one was actually in the works for quite awhile, and Pips was definitely a spur-of-the-moment giveaway.


Do you remember when I wrote about buying fabric strictly for one word on the selvage? Well, now you know the secret word: "chasing"!!I wanted to make Rebecca a customized pincushion plus another one for this great series she is conducting.

This is her pincushion. I know she loves lavender, paisley, and mentioned being a "girly girl".


But wait! That's not all (said in my best "as seen on TV voice"....). If you call before midnight tonight leave a comment by Monday noon, you'll have a chance to win this pincushion:

I hope you check out Rebecca's great series, Quilting 101. And don't forget to leave your comment. Happy sewing!

Thursday, April 7, 2011

Custom Selvage Camera Strap Tutorial (kind of...)

I'm definitely not going to give you a tutorial on how to make a customized camera strap. If you don't find the strap that came with your camera very, um, attractive, there are some really good tutorials on how to change that.

You can kind of give it the slipcover effect here and here.

Want to get rid of the whole webbing strap, make a new padded one and attach it to the fake leather end pieces? Here you go. I'm sure this would be awesome, but it looks like a lot more trouble than I want to go through.

Rather, this is a tutorial on using selvages to customize the fabric you use to make the strap cover.
For making the actual strap cover itself, I used a tutorial by Amy Priddy which I found very straightforward, with good instructions and lots of pictures.

First of all, let it be said that I am not blaming Amy at all for the problems that followed. Nope. Not one single bit. For that I'm blaming the fact that I had a cold and should have been relaxing on the couch instead of trying to do anything that involved math. When you are on cold medication, you should also NOT be considering projects that involve sharp objects (a rotary cutter), heat (iron) or moving parts (a sewing machine). Really not a good combination.

Nevertheless, my first thought was "how hard could it be??" It was a simple matter of changing out the printed fabric with some custom-made selvage fabric, and then just continue on with Amy's instructions.

The first step was to measure my existing strap. And that's exactly when my problems began. Amy said this tutorial was for a strap that was 22 inches long and 2.25 inches wide. Her instructions were to cut the fabric 23 inches long and 5.5 inches wide.

Okay. My strap was the same in length but only 1.5 inches wide. So 1 inch longer and double the width of the strap. 23 inches in length was fine, and the width should be 3 inches, right? Right? I looked at her measurements again. You know. Measure twice. Cut once. Yep 2.25 times 2 equals 5.5 inches.

I cut the base fabric for my selvages, 23 long by  3.25 inches wide, and patted myself on the back for cutting it wider than it needed to be. Better safe than sorry.

Is anyone seeing the problem already? Well, it had not dawned on me yet that my width was WAY too narrow, so I bravely carried on.

I had a nice pile of Anna Maria Horner "Innocent Crush" selvages all ready to go.

I found it really helpful to use the 45 degree angle line on my ruler to draw pencil lines on my base fabric. (You can safely use any fabric for the base--whether it is coffee stained or from a previous project that didn't quite turn out the way you thought it would).I originally drew the lines about 2 inches apart, but after sewing the first couple of selvages, I realized that drawing a line about every half inch would make it easier to keep the angle of the selvages more uniform when I sewed. And if you're not on cold medication, you might be able to get by with "eyeballing" it.

It helps to add a dab of glue too, especially at the beginning. Start on the right side, sew a selvage close to the finished edge, lay the next one on top, covering the raw edge of the first selvage, sew, continue in this manner until the whole base fabric is covered with selvages.


Turn your finished piece over and trim the excess selvages (a picture of this step would have been a nice touch but I forgot to take it...). My base fabric was now 23 inches long by 3 1/4 inches wide.

I think it was at about this point that I realized it was going to be way too narrow! I started calculating the seam allowances. I looked at Amy's measurements again, and then I saw it. She doubled the width of the strap, and ADDED ONE INCH! Geez.

Time for a "design decision."

I cut two strips of orange fabric and added one to each side. Then I continued on with Amy's directions.


When all was said and done, it was still a tight fit, and involved a needle-nose pliers to pull the existing strap through the new slipcover.

I'm going to try it again. I'll make it (at least) 1 1/2 inches wider. So much easier to trim the width than to ADD to the width.

In retrospect, the orange fabric is kind of a nice little "bonus" and I'm pretty happy with the strap.

My advice is that if you decide to slipcover your existing strap, you probably don't need the addition of the fusible batting.

Oh, and choose a time when you aren't under the influence of cold medication...

Tuesday, March 22, 2011

"You did NOT!"

Yes. I DID. I know it says in my bio over there on the right side that I buy fabric just for the selvages. Really that has only happened once or twice. And fortunately the selvages have come attached to fabric that I really liked. Case in point.

When I made the pincushion for Amanda Jean of Crazy Mom Quilts, it was a little tricky to find the word "crazy" on a selvage. To illustrate how compulsively I read selvages and am familiar with fabric lines, I knew that Robert Kaufman had a line called "Crazy for Dots and Stripes." I didn't own any of the fabric, but I went to my LQS and there it was.


And I happen to be crazy for dots and stripes, so it was a win-win.

But yesterday, I bought a whole yard of fabric that I don't like much probably won't ever use, just for one word. And I can't even tell you what the word is. Yet. Because it's a surprise for someone. I'm so excited I was able to find that one word. Even if I probably won't ever use the fabric.

However, I realize everyone's taste in fabric is different, and I know that some of you out there might never use some of the fabric that is my favorite. So if you think you might use this fabric, let me know and it could be in the mail to you. After I receive it. And cut the selvages off.

Friday, March 18, 2011

Happy birthday/blogiversary to my sister!

Have you met my sister, Carla, from Lollyquiltz? Well, she isn't my real sister, not from a biological standpoint. However, as we have gotten to know each other a little better, we have decided that perhaps we are sisters separated at birth. SO many similarities!

*We were both born in the same year. I would say which year but I didn't get her permission--and she is a teensy bit older so I need to respect that. :)
*We will both be married for 38 years this year.
*She went to college in Kansas. I went to college in Kansas.
*We both met our husbands in college.
*We both have red hair.
*We absolutely adore our grandchildren.

*We are both quilters. Which binds us together (yes, I could not resist the pun...) for sure!
*We are both hexie obsessed.

(Carla's hexies, organized by color and lots of them are already sewn together!)
(I have quite a few more than this, but they are not sewn together yet).

*We are both doing a quilt based on a Kleenex box. The same Kleenex box! (Imagine our surprise when we discovered that little odd fact...)

 Carla's is almost done:

Mine, not surprisingly, is still living in my head:

I attribute her progress on the hexies and Kleenex-box quilt to the fact that she is older. That seems reasonable, doesn't it?

She has a tremendous sense of color.

And I'll admit to being a bit envious of the beautiful backdrops she uses for her quilt photography.


To celebrate this auspicious one-year blogiversary, we are giving away one of my selvage pincushions, appropriately named "Four Seasons." Head on over to her blog and do some reading. While you're there, you'll notice that Carla has some awesome tutorials, so for a chance to win the pincushion, check out the tutorials on her sidebar, and then come back and tell me which one you would like to try first. The winner will be chosen  on Sunday, 6 p.m. PDT. Want an extra chance to win? If you can guess (in a separate comment) which one might possibly be MY favorite, well, you'll get a second chance to win. Happy reading, everyone. And happy first blogiversary, Carla!

Tuesday, March 8, 2011

Tuesday Thoughts

This is not an earth-shattering revelation, but did you know that play-doh comes in metallic colors? It does, and it smells just as good as ever. So while I like the concept of making homemade play-doh in theory, in reality it just doesn't smell the same. And that's reason enough to buy new play-doh. Oh, and because of these two...
Even the puzzle seemed extra colorful this morning.

For some reason Charlotte thought she needed help putting her shoes on. Yep, those velcro straps can be pretty tricky. So she conned charmed her brother into helping her.

Some custom pincushion orders and a few others for friends.
                                     
See you tomorrow for WIP Wednesday!

Thursday, March 3, 2011

Slip Slidin' Away

WARNING: Lots of pictures!!

*sigh* I wish it were last Thursday. Because then I would be on my way to the mountains for a long weekend of quilting and spending time with my best friends.


It is not at all unusual for there to be snow during Quilting in the Pines. Last year, I called my post "sewing in a snow globe." It was pretty much like that again this year. With one big difference. It turned treacherous to get back and forth from our cabins to the sewing room. We had snow, then it warmed up and turned slushy, then it got really cold and froze. So underneath all that pretty white snow was a layer of deadly slick ice. For the first time, we used the services of the resort SUV and driver to get us back and forth because it was just too dangerous to walk, even with snow boots. One poor lady slipped and broke her wrist in two places!

This was the view from our sewing table:
This is only about one third of the total sewing room:

And our little section:

Jennifer always makes the cutest placecards for our group. Deborah didn't like the picture Jennifer used so we tried to take sneaky pictures of her all weekend. Next year she will not be allowed to cover up her picture!
This year I didn't take many of pictures of other quilts, but this one definitely caught my eye. Super cute and lots of fun embellishment.

Here are some of the "challenge" quilts on the walls. I was standing there looking at the other quilts and someone said, "Oh, look. Someone used the fabric labels." Um, did you mean "selvages?"


Every year, we friends keep our challenge quilts totally secret from each other. When they are on the wall, we try to figure out which quilt each of us made. This year, other than mine, because my friends obviously know about my total obsession with selvages, none of us could figure out who made what. Everyone did something completely different than her normal "style." It was fun.

This was Dotty's:
And Jennifer's (she was in a three-way tie for third place. Way to go, Jennifer!). It had so many cute buttons, and I know she loves buttons. But it was machine quilted (by someone else), and Jennifer always does her own quilting on the challenge quilts. Very sneaky, Jennifer...

Jennifer spent most of the weekend working on her "gaggle of geese" because it was just so time-consuming, but also very cute and cheery.
Dotty seemed to work on a lot of different projects and accomplished a lot of different things. She even made two quilts from my Charm Parade pattern. The fabrics reminded us of Easter eggs.

Last year I was working on a quilt-along by Randi of Fresh Squeezed Fabrics. There is a basket in the sewing room where you can throw scraps you think someone else might be able to use. Well, someone did use some of my scraps and made this cute pincushion last year. This year she was sitting at the table next to us so I snapped a picture.  (Note to self: please finish the quilt because the fabrics are awesome and the pattern is great...and it's been a year.)


Are you wondering what I worked on?

While I had great intentions of working on Single Girl, the first two days I worked on Popbeads:


I'm so glad I chose Flea Market Fancy. Interestingly, not a single person blinked an eyelash when they saw that I was using FMF (FMF, people!!!!), on which I spent a virtual fortune slightly more per yard than the going rate.

I'm making two separate Birdie Stitches quilts (Central Park and Hoopla) and my thinking process was that if I had all the blocks made ahead of time, it would be easier to get the embroidery done. All the quilt blocks are finished and ready to embroider!

Sometimes odd things happen when you have been sewing for so many hours and it is 10 p.m. on a Saturday night. Dotty ended up sewing the right side and wrong side together on this block. Oops.... (Why is that non-bloggers think we bloggers take some "odd" pictures? Yeah, I don't know the answer to that one either...)

While we were having snow in the mountains, this is the kind of "snow" we have down here in Fresno. The orchards are in glorious, sweet-smelling bloom. (I asked Mark if this was a "drive-by shoot" and he assured me that he stopped the car this time.)
Sewing and friends: the perfect combination.