Thursday, March 31, 2011

"Non-Pattern" Pattern: A Creative Exercise in Quilt Construction

Many thanks to all of you for the wonderful back support, (pun intended!) that you gave me. I'm still a wee bit stiff, but moving around much better, and I am so happy to be back with this post!


Okay, picking up where we last left off a few weeks ago, (see here if need be) I was discussing the idea of "non-pattern" patterns... techniques that can be used to create a certain design look over and over, but open-ended enough to allow for complete individuality every time, and loads of variation possibilities.

Here below, is a really easy exercise, (with lots of different examples) of just one way this "non-pattern" pattern concept can be achieved. The method was one of several that popped in my head, and I decided to give it a go, as it seemed so basic and uncomplicated. I had never before constructed a quilt using this method, (nor have I ever seen anyone else do so, but let me know if I'm wrong) and I have to say I had a blast playing around with this method! The very last piece shown sealed the deal for me that this is something I want to keep exploring. So, follow along and give it a try yourself!

I used the following steps in creating each finished piece shown below. The variations in look and design come from the choices in fabric and the improvised way the pieces are constructed. (Just to note, the following photos were taken over a span of days, with lots of different daylight conditions... some good, some not so good. My apologies for the not so good!)

~ Start by selecting 4 fabrics that work well together...


Pick one of the fabrics to act as the main base, or background. From this fabric you will cut a rectangle. (For the following pieces I cut rectangles ranging in size from approximately 8" x 11" to 11" x 16", but since this method is suppose to encourage individual creativity, try whatever size you want. Don't be afraid to explore!)

~ The next step is to cut two horizontal lines across the fabric rectangle...


I eyeballed all of these cuts and used scissors instead of a ruler and rotary cutter, as I wanted the lines to vary, and be imperfect. Beginning at the top I made the first cut approximately 1/3 of the way down, and the second cut near the center, but slightly off. This left me with three sections, where the bottom was the widest, the middle was the narrowest and the top slightly wider then the middle.

~ Next step is to make vertical cuts in each of the three sections...


Starting with the bottom section, make a cut about a 1/3 of the way in on the left hand side, creating a vertical rectangle piece. For the middle section, move to the right hand side and make a vertical cut to create a square shape. On the top section, make a vertical cut close to the center, but slightly off to one side, creating two horizontal rectangles, one just slightly longer then the other.

Now move on to the other 3 colored fabrics that you have selected...


You will be cutting strips from these fabrics, which you will sew together to form wider strips of fabric. These will then be used to rejoin the 6 sections that you just cut from the base/background fabric. Again, I choose to cut with scissors so that the cut edges would be imperfect... this helps to create some variation in line and width, adding interest to the finished piece. (The strips were cut in widths ranging from 3/4" to 2".)

When joining the pieces together, start by joining the 2 separate sections in each strip. You will probably find that sometimes at least one of the re-constructed strips turns out to be shorter or longer then the others. Add or subtract fabric to remedy this, then join the 3 completed strips together.

Now here is what I made using this process:


My first selection of fabrics were an unbleached, feedsack-weight, cotton weave, (which I used as my base fabric) along with a red, woven japanese ikat, a blue crossweave, and a red, white and blue flowered vintage feedsack print.


I made three small quilts, which as you can see are similar and obviously look like they go together, yet each one has its own unique characteristics.


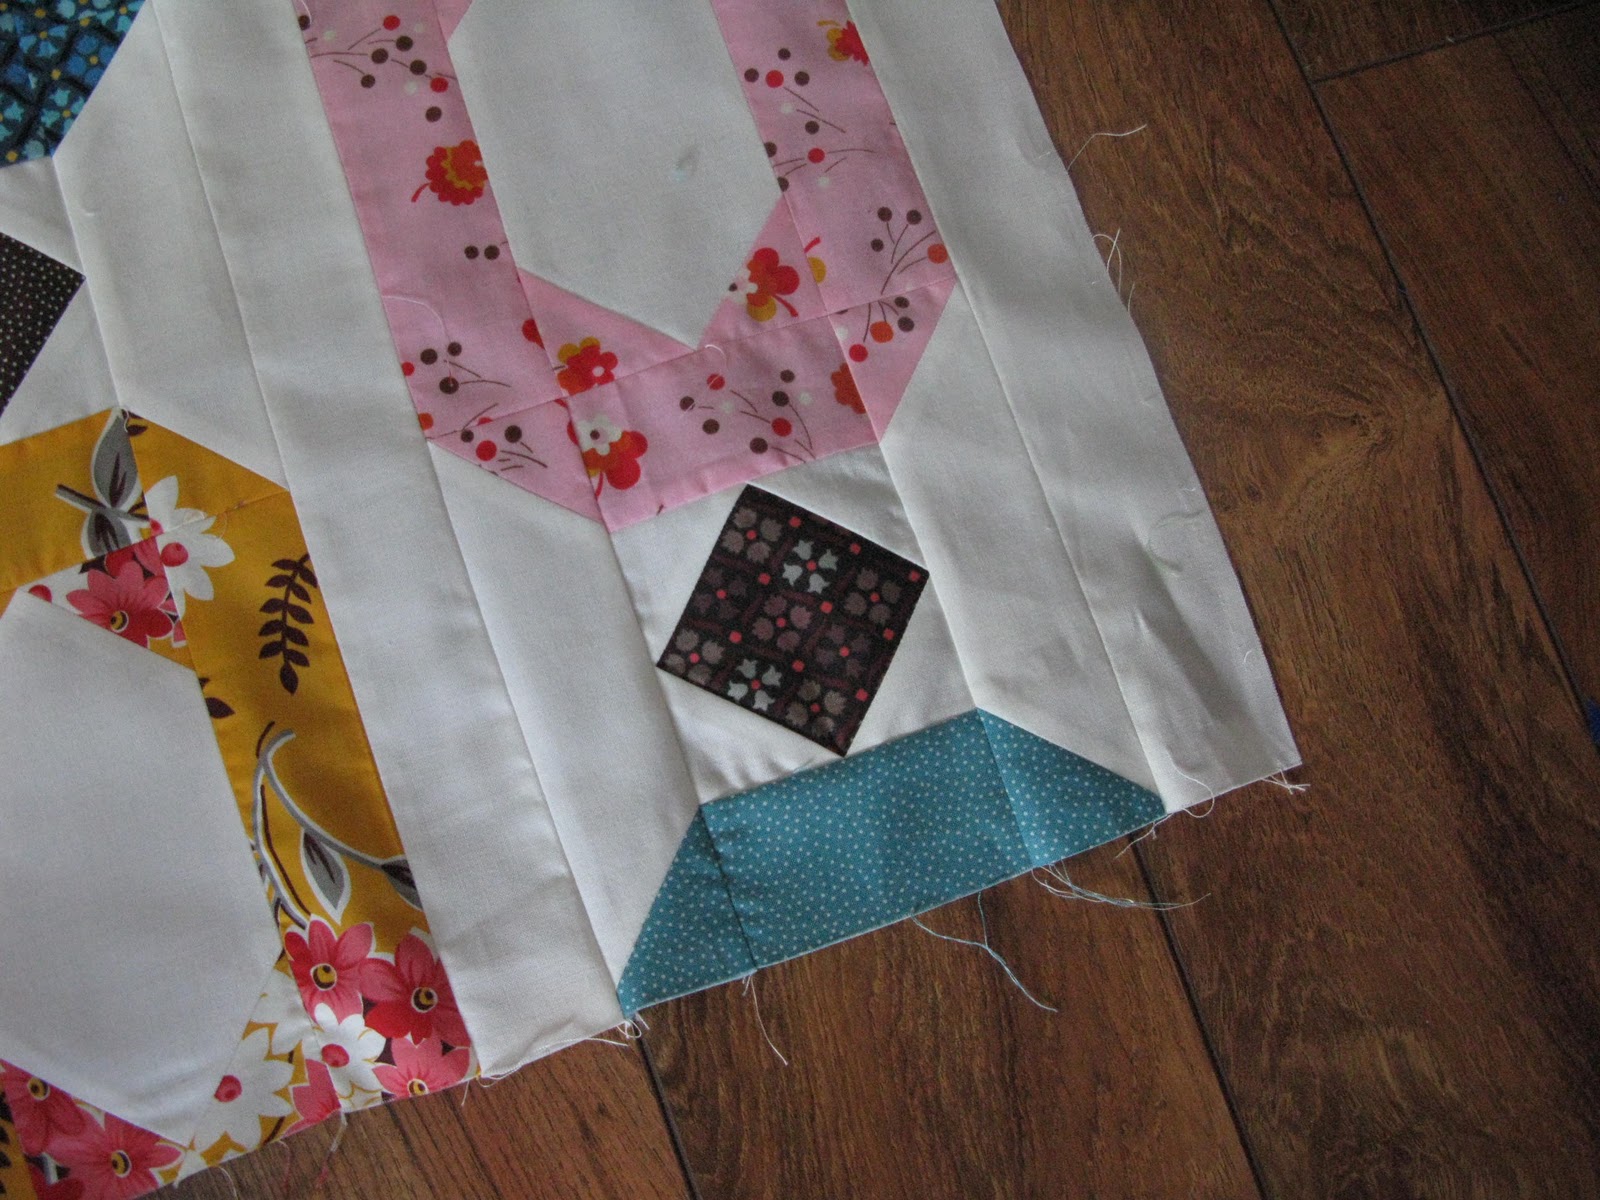
Above, you can see how fabric was added to the edges of both the top and bottom strips, in order to make them even in length to the middle strip, (which had become wider because the width of the pieces used to join its 2 sections back together were wider then those used in the other sections). Appliqued patches were also added to the top left and bottom right sections.


For this one, the two base sections in the middle strip were switched after cutting, so that the square section is now on the left side. Extra fabric was added to the top and middle strips to make them equal in lenght to the finished bottom strip, and appliqued patches were again added.


For the final piece, the two base sections in the top strip were switched after cutting, (the reason for doing this is sometimes it just makes for a better design) and extra fabric strips were added to the outer edges of both the top and bottom sections. Again, appliqued patches were added to two of the base sections.


The 3 pieces were finished by machine quilting in the ditch, along with hand quilted/embroidered stitching.

For the next group of quilts, I decided to go in the complete opposite direction with my fabric selection...


This time I went with colorful, shiny and some what iridescent dupioni silk!


Notice on this piece that one of the dark blue horizontal strips of fabric stops midway across. That's an easy to achieve effect by simply joining a strip of the base fabric to it, which creates a visual break. Along with fabric strips added to the edges of all 3 sections, a piece was also added along the upper top. (It's little intuitive and improvised decisions like that which make this "non-pattern" pattern process so individual!)


Okay, you getting the hang of how this works now? Pretty fun, huh?!


And you can see... by working this way, it's easy to get results that allow you to easily build a coherent series, yet because each piece still gets worked in an improv way, personal choices and creative decision making are consistently getting to be exercised.

And now, for my favorite and final example... I choose 4 richly dyed fabrics... a dusty blue, a yellow ochre, an earthy green and a deep maroon red...


Each of these colors got a chance to act as both a base/background and as the joining strips...


I made 4 individual quilt tops, one with a red background, one with a blue background, and so on and so forth. But instead of quilting them up separately, as in the previous examples,


I decided to join them to create one nice sized wall quilt...


So there you have it... one simple example of what a "non-pattern" pattern can be, and lots of examples of what can be done.


The thing that I liked best about working this way was the dependability and consistency that I could have in creating similar pieces, the flexibility to adapt the process to create different looks and that the whole process was fun. Let me know if you decide to give it a try, and what you think. I'd love to see what you create! (Maybe if enough people give it a go, I will start a flickr group to post to.)


As for me, I'm going to dig deeper and try to expand on this idea. From just this one exploration process, I no longer think that the best way to share my concept of a "non-pattern" pattern would be in a standard packaged pattern format. However, I do think it would be great for teaching face to face, and also think that once I develop other "non-pattern" patterns, that together they would possibly make for a good book proposal... but that is a long way off, if at all. I just throw that out there to ask that this concept of "non-pattern" pattern quilt development, (based on this particular method of beginning with a base/background fabric, which is cut apart in a particular pattern and reconstructing in the manner described above, etc.) be respected as my intellectual property. This is something that I would really like to develop and expand upon. Thanks so much for understanding, and being such a wonderful part of the process. That's why I want to share with you what I have, and please know that your continued encouragement means the world to me. xo

Birth order characteristics of fabric

I had this weird idea the other day. Mark's eyes kind of glazed over when I told him about it. A few minutes ago I finished reading the Blue Elephant Stitches blog post, "writing while pinning," where she says: "I often find myself thinking in the form of writing, and I can write some quite interesting, informative, well-thought out and even witty stuff in my head... but you'll just have to take my word for it, cause it rarely gets any farther than that."

I do the same thing. Usually in the shower. Or if I wake up in the middle of the night. Usually those middle-of-the-night ideas sometimes seem weird in the light of day. This may be one of those very ideas. But I'm going to go with it anyway.

I don't even know why I was thinking about birth order character traits. Mark and I have one son. Clearly not an issue for us. But it's still interesting to read about different traits children may possess based on their "place" in the family. At the same time, I was kind of obsessing over fabric by Denyse Schmidt, probably because I just finished Pop Beads, my quilt top using Flea Market Fancy, and I've got two quilt tops in the works using Hope Valley.  I came super late to the whole FMF party. And as I mentioned, I have paid more than I care to admit to build my collection. Why? Because I really REALLY like it. I like a lot of fabric lines, but this one probably tops the list.

Pretty much missed out on Katie Jump Rope too, so I've been collecting that as well. And I like it. Not as much as FMF, but KJR is pretty social and plays pretty well with FMF.

When Hope Valley came out, at first I was kind of "ehh, whatever" about it but she has really grown on me.

When Denyse's latest line came out, well, I'll be honest, I have not purchased a single fat quarter of it.  I've seen some cool quilts made with it, but I think was more intrigued with the quilt design than the fabric. (My apologies to all of you who consider it one of your favorites.)

I don't know why the birth order traits correlation (from here) popped into my mind, but here goes:

Flea Market Fancy (the first-born child): natural leader, high achiever, organized, bossy (not sure about that but someone was telling me to buy, buy, buy!), adult-pleaser. "First-born children desire control and they will typically become a compliant nurturer or a more aggressive mover and shaker." Seems pretty accurate. I don't believe I have seen any other fabric lines that caused a a write-in campaign to Freespirit Fabrics begging them to reprint.  But they decided to move on...

Katie Jump Rope and Hope Valley (the middle children): flexible, easy-going, social, peacemakers (or substitute piecemakers!). "The middle child(ren) will demonstrate the greatest variety of character traits, but they will usually be opposite of their older sibling."


Greenfield Hill (the last child--although I'm sure this only temporary until the next "child" comes along): risk-taker, creative, self-centered, competitive, bored easily. "They are also often driven to catch up with their older siblings and follow in their footsteps." We'll see.

(image from Freespirit)

If you are still here, then I think you deserve a little compensation for your attention. So how about the scraps from my Pop Beads quilt?

What makes our hearts race a little faster when we see certain fabric is so subjective. That's why we sometimes have to perform CPR on our credit cards (to quote a commenter from yesterday).

Here is the question to answer: Where do you fall in the birth order in your family? Any characteristics you feel like sharing with the rest of us? You can also comment on whether or not this was too weird a topic that I should have kept to myself, but it won't give you an extra chance at winning. (hehe)

I'll  pick a winner on Saturday at 6 p.m. PDT.

ETA: I mean no disrespect whatsoever to fabric designers or fabric lines. I'm glad they are out there designing fabulous fabric for us to work with, something I myself could never do. I also realize the pressure to do something different and wonderful each and every time must be phenomenal. I have just been spending a lot of time with these specific lines lately, and my mind kind of went off on a little tangent.

Thankful Thursday

Today I am thankful for Herbal Tea. I know this is a shallow choice but when you are going through a weight loss program you find all the little things to be thankful for each day. Herbal tea is actually helping me out so much on this program. I have always been a big soda drinker (mostly diet soda), but since I have discovered my new love for herbal tea I am a changed woman. I drink water all day at work and when I get home at night I just want something with some flavor. If you are also going through a weight loss program or just want to change things up a bit, I highly recommend trying your favorite flavor of herbal tea hot or iced!

Photobucket

Handmade Flowers

I painted then added the handmade paper flowers to the top.  My altered flowered box.


Linking this to Ambers Crafts and Stuff: Flowers Challenge and
Tuesday Throwdown Challenge: Florals
Pink Paper Paradise: Showcase

Zentangle Challenge #15


This week's challenge is named Love Your Curves, Baby. We were instructed to use only curves in our design. This challenge was much easier for me than last week's challenge when we were to only use straight lines. My design results are not officially Zentangle designs, more like Zentangle inspired.

Wednesday, March 30, 2011

Wordless Wednesday

Photobucket
My Bossy 5 year old

Make your own embellishment.

2 Sisters Challenge blog is having their challenge of make your own embellishment.  I hope this qualifies.
This is a homemade feather.  It is made of wire and old book pages to look like a real feather....so what do you think? 

WIP Wednesday #20

My Pop Beads quilt top is completed. I won't lie. I LOVE it. For all of you who are so "over" Flea Market Fancy, let me say this. I came late to the party, and I have paid a small king's ransom to be able to attend!

Here is what I need help with:

1. It's just a small thing really, but I used a couple of fabrics from the "freckles" line, which was said to be companion fabric for Flea Market Fancy, sort of like a first cousin (more on that later). In one corner I have used some turquoise "freckles" and then I got the green leaves in the mail. Would you take the time to switch them out?

2. I need suggestions on quilting. I'm thinking of doing big stitch around the inside and outside of each bead and around the brown connector diamonds, but if someone could give me thoughts on machine stitching, I would be open to that as well.

Have you ever thought of a particular designer's fabric lines having something in common with sibling birth-order characteristics? Probably not. Mark's eyes kind of glazed over when I mentioned writing a post about that.

But I think I will delve into that topic anyway. If you are interested in some Flea Market Fancy scraps (and I do mean scraps), come back tomorrow for a giveaway of these.

Along with something special I intend to do with these:

I also finished these two blocks for the do.Good Stitches Faith circle. (Stashbuster blocks from Material Obsession 2--very fun. I will make more of these!)


Head on over to Freshly Pieced and see what everyone else is working on.

Guest Blogger

I was recently invited to write a post over at the blog And Then We Set it On Fire.  This blog shares the discoveries and experiments made while exploring surface design techniques.  You can read my post here, which was published today.

I shared some new experiments there, which included these:


My guest post focused on my experiments with FW Acrylic Inks.  I go into more detail about the above projects.  I hope you'll visit the blog and check it out.

Tuesday, March 29, 2011

Surprise in my Mailbox!!

I won a great giveaway from They call me Ganky, such a sweet lady who shares all kinds fun things happening in her life with great photography!!!
Well this box wouldnt fit in the mailbox.  It was filled to the brim with all kinds of goodies, it was like Christmas.  a great magazine, a cookbook, a beautiful apron, adorable notepad, sachet, wonderful box of tea, easter bunnies, spring treat bowl, garden angel and super cute card.  WOW a big THANK YOU to Theresa, They call me Ganky blog.

The Postman Always Rings Twice...

Well, yesterday he did. Good thing, too, because I needed some major fabric therapy. But if this happened on a regular basis, I would need financial therapy...


Need some therapy yourself? You can get some here and here.

P.S. Now I'm a little sorry I went to the links. Bad news for me, but good news for you: At Fatquarter Shop, until April 1, Kona and Bella solids are 20% off with the coupon code "solids." *sigh*. It was still good therapy for me...

What I've been up to

I thought some of you might like to see some of the quilts I've worked on recently.


 This quilt was made by Helen Etherington. Helen recently passed away and she left some wonderful quilts for her grandchildren.  I'm sure the recipient of this one is going to appreciate it


My husband loves to do Sudoku puzzles. So I made this quilt out of one of his puzzles. This quilt is a sample for a class I'll be teaching at the Cotton Tree Quilt Shop.


This quilt was made by Bonnie McKinnon. I just love that fabric line.


Bonnie's Christmas Quilt has a wonderful array of Christmas fabrics


This lovely Crown of Thorns Quilt was made by Diane Bjorgaard.  It is just beautiful.


This fun quilt was made by Helen Ball for her husband. It is so bright and cheery that I'm sure he is going to love it.